Monday, January 23, 2012

mold work finished and trip to Carmel

All the work on the Tree of Life commission is basically finished, and the molds are now ready to ship to the foundry.

I wanted to add reinforcing to the large plaster mother mold for the tree branches. I used some aluminum driveway marker stakes (after using a bolt cutter to remove the reflector). They bend to the contours of the mold and the twists give something for the plaster to grab. We embedded them into the plaster mold with another layer of plaster.

Then, I trimmed the edges of the plaster mother mold with a chisel and carefully removed the plaster mother molds.

We had to cut out branches as we divided the rubber molds from the clay pattern. It was the only way to cut apart the rubber in the negative spaces between the intertwining branches.

We finally got the rubber molds separated, and placed them back into the mother mold.

These are the molds for the root sections.

Then, I built a crate...

...and gathered padding to cushion the molds for the ride across the Great Plains inside a freight truck.

I had a template made from 3/16" steel plate for the granite company to use in cutting the notch that the bronze tree will fit into. I wish that I had taken a camera with me to Ward Forging of New Albany, Indiana. They used these huge steel rollers to precision bend the steel plate (would have made a great photo...).

Now...on a personal note...
Saturday, we went to the residence of Lindsay and Will Arvin for a family gathering. This is Lindsay's mom, Emily, who is Meg's niece.

Will recommended that we try out Bazbeaux Pizza in downtown Carmel, Indiana. In my opinion, that's the best pizza that I've ever had - good call, Will!

Then, he led the way down the street to Evan Lurie Art Gallery. Check out these cast stainless steel door handles.

The work in the gallery (and the space) was top quality. I was particularly impressed with the paintings of Alexi Torres. Carmel, Indiana has a lot going for itself - check it out if you get the chance. (all photos copyright 2012 Meg White).

Sunday, January 8, 2012

Demolding, and a New Year in Newport

After you make plaster mother molds over flexible rubber inner molds, it is time to de-mold.

We use a thin, flat chisel to gently pry apart the 2 halves of the plaster mother mold. Don't get in a hurry, just slowly work the blade in different points around the mold and...

...if you didn't leave any undercuts when making the rubber mold, it should come apart without too much trouble.

I use the chisel to clean up the edges of the plaster mold. This is not really necessary, but it makes for better craftmanship.

Before I put on the plaster molds, I used a heavy pair of scissors to cut the edges of the rubber mold. This gave me a strong edge and it makes it easy to pull apart at the shim. I gently work my way around the whole piece, pulling the two halves of the rubber apart.

There are still the first 2 coats of the rubber mold to cut through. I gently pull the mold apart with one hand and use and exacto to cut the thin layer of rubber that is left. You can see the green clay emerging.

When you've cut all the way around, the two halves will completely separate. You can then remove the clay sculpture part. Meg has already started reprocessing the clay into her Heron sculpture.

We clean the little remnants of modeling clay from the rubber mold.

Here is one half of a rubber leaf cluster mold, ready to go to the foundry. They will pour wax into these molds and turn the wax patterns into bronze.

On a more personal note...Meg and I spent New Year's Eve with my old college Room mate, Tom Mitts, who lives in Newport, KY (across the river from Cincinnati). We ate (and ate)...
...and drank...

...and played chess. One of the most enjoyable New Year's Eves that I've ever had. Thanks Tom! (all photos copyright Meg White).

plaster mother molds

After we finished the rubber molds on the Tree of Life commission, it was time to apply the plaster mother molds.

Actually, we use hydrocal which is much harder than molding plaster ( also more expensive). We sprinkle it into rubber bowls of water until no more plaster will dissolve. It will float on the top when it has reached the point of saturation. We gently use our hands to make sure that there are no lumps of undissolved plaster. We don't actually stir it, which would introduce air into the mix.

We soak hemp fibers in a bucket of water. We use these fibers for reinforcing the plaster mother molds. You can also use burlap or fiberglas mesh for reinforcing plaster.

Next, we apply a first coat of plaster over the rubber. If you can lay the molds flat, it's much easier to make the plaster molds.

Then, we take the wet hemp, soak it in freshly mixed plaster and spread it over the first plaster coat. We aren't waiting for the first coat to dry, we move right along with getting each piece done as fast as possible.

We then build up the mold to about 1 inch thick, more or less.

I use my hands to build up a strong edge for the mold. At a certain point, plaster will work beautifully and you can shape it nicely. That brief time between too runny and too thick is short-lived, and you have to move fast.

It took quite some time for Meg and I to finish both sides of 23 leaf cluster molds (days).

Then, it was time to put the mother mold on the Tree trunk. Since it was vertical, we applied the first coat with brushes.

We did the bottom sections first, to give support to the weight of the top portion.

I still want to add reinforcing metal rods and another layer of plaster to the top portions of the Tree. Otherwise, we're almost through with the mother mold portion of this commission.

The White Hand of Saru(wo)man! (all photos copyright Meg White.)

Tuesday, December 13, 2011

rubber mold making (continued)

In the previous posting (below), I described everthing that you need before applying a rubber mold. Now, you are ready to do it.

Before you open the rubber, spray the Pol Ease 2300 onto the clay. It will have a wet look when there is enough.

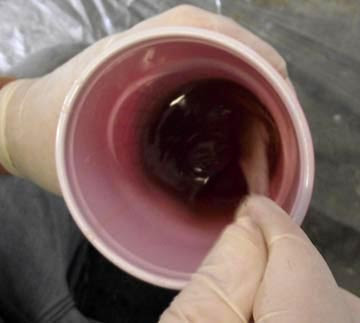
I carefully pour part A and Part B into their respective cups, up to the lines (as shown in the previous post). Part A is like a thick honey. Part B is like maple syrup.

I pour each part into a mixing cup. I scrape it out of the clear wine cup with a knife used only for that purpose. I use a 3rd knife for mixing. The knives near cup A or cup B will last all day, if you keep them away from each other. This is the color of the stuff when it is first mixed.

You stir, mixing it well, until it begins to change into this lighter color. It is now 'going off', and you can feel a little bit of heat from the chemical reaction. You've got to brush it on Now! MOVE!

You apply 1 coat and let it harden to where it is tacky (about 45 minutes). Then, add a second coat. Wait about 45 minutes until tacky.

It's now time to add the part-line shims. Making and applying the part-line shims is the hardest part of the job. We use clear plastic sheets and plastic bubble sheets from sculpture depot. We use a plastic freezer tape to stick the plastic together. It has been smeared both sides with Trewax (it's for floors, and is made of Carnuba). We fasten the shims to the sculpture with pins that have plastic heads on them.

Then, we mix another batch of rubber. When it changes color, we mix in polyfiber until it has the consistency of icing.

We scrape it into a baggy and cut a small hole in the corner.

We squeeze a bead of it around the base of the shims.

We smooth the bead out with a plastic knife. As soon as this mix starts hardening (30 45 minutes) pull out all the pins.

We then apply 5 more coats over everything, waiting 45 minutes between each coat. If there are any undercuts, we mix a batch with Polyfiber and fill them in, using a plastic knife. Next, the plaster mother molds (the fun never stops...)

rubber mold checklist

We've seen a lot of interest when we post about how to do molds. So, here are some more in-depth pointers to de-mystify mold making.

Make sure that you have plenty of mold material for your project. It's better to have too much, rather than not enough. We use Polygel 40 from polytek. Don't open it until you are ready to use it. Get all your supplies together first before opening the containers. Keep the containers closed as much as possible and store in a place with even temperatures, like a basement.

You'll be making a mess, when doing rubber molds. Wear old cloths! The mold material will not wash out. Do it someplace like a garage or basement where you won't hurt the floor. We spread down plastic and wear latex gloves. Get a big box of gloves, because you'll use a bunch of them and you can't re-use them.

You'll need various types of release agents. We use the spray release from Polytek (Pol Ease 2300) for the clay. Vaseline is used on the wood boards and armatures. Trewax is used on the plastic part line shims.

You'll need 'party' cups for mixing and clear 'wine' cups for measuring the 2 types of rubber.

Buy a couple boxes of 1" "chip' brushes. You'll go through 50-100 on an average mold project. Look around for prices - I pay about $.10 each, but I've seen them priced over $1.00 each (makes a difference to me). Buy at least 50 to 100 plastic knives for mixing.

This is bubble sheet from Sculpture Depot of Loveland, Co. It's hard to see, but there is a clear piece of plastic lying across the top. We use this to make part-line shims. The plastic tape is also from Sculpture Depot. We use pins with plastic tops to fasten the shims to the clay sculptures. The plastic tips on the pins help you to see the pins when you go to pull them back out.

You'll need a few tools: like x-acto knives and extra blades, a razor knife and extra blades (for de-molding). Small scissors are for cutting plastic part-line shims. Big scissor (or small shears) are for trimming the rubber molds. You'll need permanent markers for making part-line shims and for marking the plaster molds.

You'll need polyfiber from Polytek, which is a fluffy substance that will make the mold material into a knife-grade thickness - for filling in major undercuts or attaching part-line shims. Plastic bags are for squeezing on a bead of the mix - like putting icing on a cake.

I take 2 of the clear wine cups and make marks on them at equal heights. I try to find something in the studio of about the right thickness (like a box of screws in this case). I spin the cups against a marker. The 2 parts of the mold material are mixed by equal volume. This gives me a precise line for pouring out the rubber compound.

I put down plastic. Then I find 2 buckets to set the cups onto (saves on the back when pouring). I place one plastic knife by each cup - and only use them for emptying into a mixing cup. The idea is to only let Part A and part B to come together in the mixing cup.

I vaseline all boards and armatures, so that the molds won't stick.

I try to do as much as possible the day before I start mixing rubber. If you can do the part-line shims ahead of time, it will make your life easier.

After you've cut and taped the part-line shims, you need to spread a layer of Trewax onto both sides, to keep the mold material from sticking to it.

Mold making is meticulous and boring - it's easy to get distracted.