Tuesday, December 13, 2011

rubber mold making (continued)

In the previous posting (below), I described everthing that you need before applying a rubber mold. Now, you are ready to do it.

Before you open the rubber, spray the Pol Ease 2300 onto the clay. It will have a wet look when there is enough.

I carefully pour part A and Part B into their respective cups, up to the lines (as shown in the previous post). Part A is like a thick honey. Part B is like maple syrup.
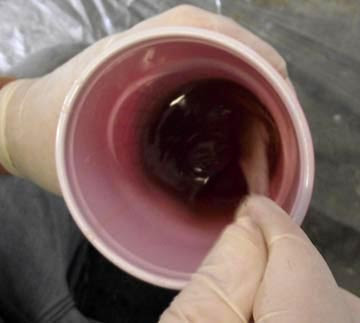
I pour each part into a mixing cup. I scrape it out of the clear wine cup with a knife used only for that purpose. I use a 3rd knife for mixing. The knives near cup A or cup B will last all day, if you keep them away from each other. This is the color of the stuff when it is first mixed.

You stir, mixing it well, until it begins to change into this lighter color. It is now 'going off', and you can feel a little bit of heat from the chemical reaction. You've got to brush it on Now! MOVE!

You apply 1 coat and let it harden to where it is tacky (about 45 minutes). Then, add a second coat. Wait about 45 minutes until tacky.

It's now time to add the part-line shims. Making and applying the part-line shims is the hardest part of the job. We use clear plastic sheets and plastic bubble sheets from sculpture depot. We use a plastic freezer tape to stick the plastic together. It has been smeared both sides with Trewax (it's for floors, and is made of Carnuba). We fasten the shims to the sculpture with pins that have plastic heads on them.

Then, we mix another batch of rubber. When it changes color, we mix in polyfiber until it has the consistency of icing.

We scrape it into a baggy and cut a small hole in the corner.

We squeeze a bead of it around the base of the shims.

We smooth the bead out with a plastic knife. As soon as this mix starts hardening (30 45 minutes) pull out all the pins.

We then apply 5 more coats over everything, waiting 45 minutes between each coat. If there are any undercuts, we mix a batch with Polyfiber and fill them in, using a plastic knife. Next, the plaster mother molds (the fun never stops...)

rubber mold checklist

We've seen a lot of interest when we post about how to do molds. So, here are some more in-depth pointers to de-mystify mold making.

Make sure that you have plenty of mold material for your project. It's better to have too much, rather than not enough. We use Polygel 40 from polytek. Don't open it until you are ready to use it. Get all your supplies together first before opening the containers. Keep the containers closed as much as possible and store in a place with even temperatures, like a basement.

You'll be making a mess, when doing rubber molds. Wear old cloths! The mold material will not wash out. Do it someplace like a garage or basement where you won't hurt the floor. We spread down plastic and wear latex gloves. Get a big box of gloves, because you'll use a bunch of them and you can't re-use them.

You'll need various types of release agents. We use the spray release from Polytek (Pol Ease 2300) for the clay. Vaseline is used on the wood boards and armatures. Trewax is used on the plastic part line shims.

You'll need 'party' cups for mixing and clear 'wine' cups for measuring the 2 types of rubber.

Buy a couple boxes of 1" "chip' brushes. You'll go through 50-100 on an average mold project. Look around for prices - I pay about $.10 each, but I've seen them priced over $1.00 each (makes a difference to me). Buy at least 50 to 100 plastic knives for mixing.

This is bubble sheet from Sculpture Depot of Loveland, Co. It's hard to see, but there is a clear piece of plastic lying across the top. We use this to make part-line shims. The plastic tape is also from Sculpture Depot. We use pins with plastic tops to fasten the shims to the clay sculptures. The plastic tips on the pins help you to see the pins when you go to pull them back out.

You'll need a few tools: like x-acto knives and extra blades, a razor knife and extra blades (for de-molding). Small scissors are for cutting plastic part-line shims. Big scissor (or small shears) are for trimming the rubber molds. You'll need permanent markers for making part-line shims and for marking the plaster molds.

You'll need polyfiber from Polytek, which is a fluffy substance that will make the mold material into a knife-grade thickness - for filling in major undercuts or attaching part-line shims. Plastic bags are for squeezing on a bead of the mix - like putting icing on a cake.

I take 2 of the clear wine cups and make marks on them at equal heights. I try to find something in the studio of about the right thickness (like a box of screws in this case). I spin the cups against a marker. The 2 parts of the mold material are mixed by equal volume. This gives me a precise line for pouring out the rubber compound.

I put down plastic. Then I find 2 buckets to set the cups onto (saves on the back when pouring). I place one plastic knife by each cup - and only use them for emptying into a mixing cup. The idea is to only let Part A and part B to come together in the mixing cup.

I vaseline all boards and armatures, so that the molds won't stick.

I try to do as much as possible the day before I start mixing rubber. If you can do the part-line shims ahead of time, it will make your life easier.

After you've cut and taped the part-line shims, you need to spread a layer of Trewax onto both sides, to keep the mold material from sticking to it.

Mold making is meticulous and boring - it's easy to get distracted.