Tuesday, December 13, 2011

rubber mold making (continued)

In the previous posting (below), I described everthing that you need before applying a rubber mold. Now, you are ready to do it.

Before you open the rubber, spray the Pol Ease 2300 onto the clay. It will have a wet look when there is enough.

I carefully pour part A and Part B into their respective cups, up to the lines (as shown in the previous post). Part A is like a thick honey. Part B is like maple syrup.
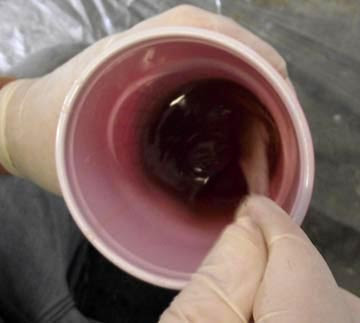
I pour each part into a mixing cup. I scrape it out of the clear wine cup with a knife used only for that purpose. I use a 3rd knife for mixing. The knives near cup A or cup B will last all day, if you keep them away from each other. This is the color of the stuff when it is first mixed.

You stir, mixing it well, until it begins to change into this lighter color. It is now 'going off', and you can feel a little bit of heat from the chemical reaction. You've got to brush it on Now! MOVE!

You apply 1 coat and let it harden to where it is tacky (about 45 minutes). Then, add a second coat. Wait about 45 minutes until tacky.

It's now time to add the part-line shims. Making and applying the part-line shims is the hardest part of the job. We use clear plastic sheets and plastic bubble sheets from sculpture depot. We use a plastic freezer tape to stick the plastic together. It has been smeared both sides with Trewax (it's for floors, and is made of Carnuba). We fasten the shims to the sculpture with pins that have plastic heads on them.

Then, we mix another batch of rubber. When it changes color, we mix in polyfiber until it has the consistency of icing.

We scrape it into a baggy and cut a small hole in the corner.

We squeeze a bead of it around the base of the shims.

We smooth the bead out with a plastic knife. As soon as this mix starts hardening (30 45 minutes) pull out all the pins.

We then apply 5 more coats over everything, waiting 45 minutes between each coat. If there are any undercuts, we mix a batch with Polyfiber and fill them in, using a plastic knife. Next, the plaster mother molds (the fun never stops...)

rubber mold checklist

We've seen a lot of interest when we post about how to do molds. So, here are some more in-depth pointers to de-mystify mold making.

Make sure that you have plenty of mold material for your project. It's better to have too much, rather than not enough. We use Polygel 40 from polytek. Don't open it until you are ready to use it. Get all your supplies together first before opening the containers. Keep the containers closed as much as possible and store in a place with even temperatures, like a basement.

You'll be making a mess, when doing rubber molds. Wear old cloths! The mold material will not wash out. Do it someplace like a garage or basement where you won't hurt the floor. We spread down plastic and wear latex gloves. Get a big box of gloves, because you'll use a bunch of them and you can't re-use them.

You'll need various types of release agents. We use the spray release from Polytek (Pol Ease 2300) for the clay. Vaseline is used on the wood boards and armatures. Trewax is used on the plastic part line shims.

You'll need 'party' cups for mixing and clear 'wine' cups for measuring the 2 types of rubber.

Buy a couple boxes of 1" "chip' brushes. You'll go through 50-100 on an average mold project. Look around for prices - I pay about $.10 each, but I've seen them priced over $1.00 each (makes a difference to me). Buy at least 50 to 100 plastic knives for mixing.

This is bubble sheet from Sculpture Depot of Loveland, Co. It's hard to see, but there is a clear piece of plastic lying across the top. We use this to make part-line shims. The plastic tape is also from Sculpture Depot. We use pins with plastic tops to fasten the shims to the clay sculptures. The plastic tips on the pins help you to see the pins when you go to pull them back out.

You'll need a few tools: like x-acto knives and extra blades, a razor knife and extra blades (for de-molding). Small scissors are for cutting plastic part-line shims. Big scissor (or small shears) are for trimming the rubber molds. You'll need permanent markers for making part-line shims and for marking the plaster molds.

You'll need polyfiber from Polytek, which is a fluffy substance that will make the mold material into a knife-grade thickness - for filling in major undercuts or attaching part-line shims. Plastic bags are for squeezing on a bead of the mix - like putting icing on a cake.

I take 2 of the clear wine cups and make marks on them at equal heights. I try to find something in the studio of about the right thickness (like a box of screws in this case). I spin the cups against a marker. The 2 parts of the mold material are mixed by equal volume. This gives me a precise line for pouring out the rubber compound.

I put down plastic. Then I find 2 buckets to set the cups onto (saves on the back when pouring). I place one plastic knife by each cup - and only use them for emptying into a mixing cup. The idea is to only let Part A and part B to come together in the mixing cup.

I vaseline all boards and armatures, so that the molds won't stick.

I try to do as much as possible the day before I start mixing rubber. If you can do the part-line shims ahead of time, it will make your life easier.

After you've cut and taped the part-line shims, you need to spread a layer of Trewax onto both sides, to keep the mold material from sticking to it.

Mold making is meticulous and boring - it's easy to get distracted.

Sunday, November 27, 2011

Marble Dove

This week, I carved a marble dove for the Tree of Life commission.

About 10 days ago, the block of pure white Colorado Yule Marble arrived at Cave Hill Cemetery. I was quite impressed with the quality of the stone - it was flawless. Also, they took great care in the crate and packing for the stone block.

The first task was to carve the outline of the dove, using the clay model as the pattern.

Then, I marked the forms of the sculpture onto the preform with a wax china marker.

I blocked in the forms onto both sides of the marble piece.

For all intents and purposes, the marble dove is finished. I will refine the head and other forms as I spend more time with the piece.

I have completed all of the clay work for the Tree. I put the 23 leaf clusters up on pedestals of wood, to make it easier to put a 2 part mold onto them.

Introducing Part A and Part B...the mold material has arrived (you're looking at $560.00 worth of rubber!). I am ready to begin putting the molds onto the Tree of Life.

Monday, November 7, 2011

Tree Pruned and 3 sculptures installed

This is what the Tree of Life commission looked like, the last time that I posted updates on this blog.

Now...prepare yourself for a shock...

This is what it looks like now. It will not become whole again until it is recreated in the bronze foundry. Like a Phoenix, it will rise from the fiery glow of the foundry furnace and the blinding arcs of the welders.

I used a sawz-all to cut all the leaf clusters off the branches. Meg caught them as I cut them. I then numbered and pinned them to numbered squares of plywood.

I am still refining the leaf clusters and branches, and will continue to do that until the marble for the Dove arrives. I want to confirm the fit of the finished marble Dove to the clay leaves, before covering the clay sculpture parts with mold material.

Last week, 3 of my stone sculptures were installed at a private residence. It was a long day - beginning before first light and ending well after dark. JBB Inc. of Hardinsburg sent out their 23 ton truck-mounted crane for the delivery and installation. I asked for Derrick Sheroan as operator - wouldn't have it any other way.

Two of the sculptures were center pieces for fountains. Fountains mean water, and at some point I was going to have to get my feet wet.

This is the view of the sculpture "Embrace" from the house. The fountain is not completely finished. I hope to get pictures when it all comes together.

This is the other view - what I consider as the front of the piece.

Then, we moved around to the back of the house to set "Reach".

It was also intended as a fountain piece.

The third piece that we installed is called "Promise". It is functional as seating.

A friend from high school days, Jeff Linkous came for a visit. He pointed out that we hadn't seen each other face-to-face for 14 years! Hopefully, we're going to break that pattern.
All photos by Meg White

Sunday, October 23, 2011

Tree of Life and a Halloween party

The work continues on the Tree of Life commission.

I spent the first couple days of the week figuring out how to attach the Dove to the Tree. This is a full scale clay model of the Dove, which will be carved from Colorado Yule Marble. There is a cluster of leaves that was custom fitted to the back of the Dove, and 2 branches that make a cross brace to hold the Dove securely.

I have begun the process of cutting leaf clusters from the branches with a sawz-all. I number the clusters on a photo of the Tree (in red ink in the lower right hand corner), and number the clusters as well, so that it will come back together correctly at the foundry.

I also use a register mark, to make sure that the cluster is properly oriented, when it is welded back together.

The rest of the week was spent cleaning up the clay work on the leaf clusters. This will continue all through next week, as well.

Saturday night, we were invited to a Halloween party at the home of Steve McMillen and Alice Kimble.

Peewee Herman was our host.

Dorothy and Scarecrow from the merry ol' land of Oz.

If you think your head hurts now...wait till the morning.

Lizard Boy and zombie dog have a tussle.

Two leather-clad rockers and a pumpkin.

A zombie and a Viking.

The trick is to know when to quit.

Cat girl...and in the background Peewee and something that's been dead for a while.

Gandalf brought fireworks to the party.

Whoosh! Lift off from the end of a wizard's staff.

A fiery Angel. (photos by Meg White)