
Monday, I polished the Wave Vessel and moved it out of the studio for powerwashing.
 Saturday, I polished and drilled the base. The vessel was attached to the base with a brass pipe to hold the piece and allow draining. A drain channel in the bottom, back side allows water to move from under the piece. The base came home on the Wednesday stone run - you can see it on the pallet, top left (on edge) in the picture of the loaded truck below.
 The rest of the week was devoted to the creation of a pair of entry / gateway sculptures that are based on this rendition. I've been struggling with the title - I think the winner is "Reveal", although I've considered "Inner Truth". The composition is based on Geodes, specifically the Amethyst 'Cathedrals'. It represents the revealing of inner beauty hidden inside a rough exterior.
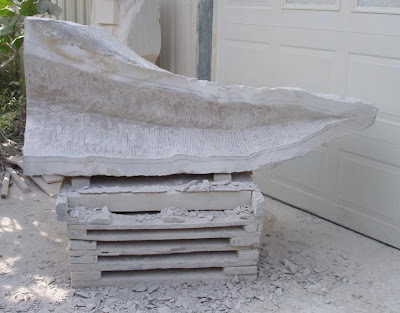
 The first half of the pair was moved to the shady side of the studio. This piece is 6 foot long by 2-1/2 foot by 2-1/2 foot and weighs approximately 3,000 lbs. I've already drawn the line to make the bottom flat (on left) and drawn the lines for the inside cavity.
 The first task is making the bottom flat. I make a cut as deep as the blade will go, then break off the waste stone with a hammer and make another cut. Then I check the flatness with a level and grind where needed.
 I remove the bulk of waste stone from the inner cavity by making parallel cuts with the saw and breaking the pieces out with a hammer.
 I used the air hammer and carbide-tipped chisel to clean out the inside cavity and create a preform surface to begin the inlay of the marble pieces and carve the intertwining forms.
 The next step involved the creation of the 3 rounded marble forms that will be inlaid into the cavity. This is a piece of Brazilian White Marble and is scrap from the School for the Blind commission by Paul Fields. My apprenticeship to Paul in 1987-90 involved working on that commission and one of the perks was being given some of the waste pieces.
 I used the diamond saw to cut it into 3 elliptical preforms.
 I used a grinder to shape the pieces into rounded 'cabochons' - flat bottoms, elliptical outline and rounded tops. The piece on the right has been bush textured by the air hammer. This makes a very sparkly surface when its in direct sunlight.
 The next step involves inlaying the marble pieces into the stone cavity.
 At one point during the week, work was interrupted when a cold front moved through the area. I snapped this picture of a funnel cloud forming over the studio.
 Wednesday, Meg and I rented a flatbed truck from Penske and made the 100 mile trip to Bloomington for a load of stone. Most of the way is across pretty countryside, but hard to make time on the hilly and winding roads.
 We had a little time to kill before they could load us, so we took pictures of their operation. This is the quarry where they cut the big blocks from the ground. A group of 3 men are standing on a 250 ton piece that has been cut from the face and turned over. They are drilling holes and splitting it into blocks that will weigh 10,000 to 20,000 lbs. apiece.
 The large quarry blocks are moved to the building with the band saws. The diamond band saws cut the block into slabs.
 This is a better look at the band saw.
 The slabs are then moved to another building that has a series of bridge saws. The thinner slabs are cut with a 3 foot diameter saw, the thicker pieces are cut with this 5 foot diameter saw.
 One of the workers pointed out this cut block to us, which was ordered by another sculptor. Nobody knew who the sculptor was or what the piece would be - it'd be interesting to know.
 Our order was loaded onto our rented truck. Most of this load will become bases for our sculptures.
 Meg wanted to drive all the way up and back; which was fine by me as I could sit back and look out the window.


 The next step involved using a grinder with a masonry wheel (shown) to smooth out the bumps left by the diamond wheel.
 Then comes the long process of sanding and polishing the form. The first step is using this sander with a 36 grit pad.
 I switched to an air-powered orbital sander. This gives a very smooth surface, without the swirls that the regular sanders leave. I use the progressively finer grits of 80, 220 and 400 to get the final surface finish.
 The polished hemisphere gets a 1 inch hole for the threaded brass pipe that will allow the vessel to drain and will work as a pin to hold the vessel on its base. I've placed a piece of red tape on the drill bit so that I will have the hole at the correct depth. This will help me know that I'm at the right depth for the bottom when I flip the piece over and begin to hollow out the inside. The level on top of the piece will help me keep the hole vertically plumb.
 In the tradition of 'restless rocks', the piece is flipped over again.
 Using the diamond wheel (shown), I cut out the waste stone from inside the vessel.
 Then, repeating the process of the outside, I ground the form of the inside.
 This was the progress at the end of the week. I have formed the 'waves' around the edges and the inside and edges have been sanded at the 36 grit level.

 Our guide (and property owner) Bill Frazer, took 5 car loads of 10 adults and 2 kids to the site of 3 abandoned mines -Columbia , Eureka (shown above) and Mary Belle-that were within walking distance of each other. They were located in a wooded area next to a creek. Essentially, the sites consists of the funnel-shaped holes of the caved-in mine shafts and small piles of mine dump rubble (shown).
 After hours of sweat drenching and muddy labor, Meg, myself and most of the others had little to show for our effort. This family from Georgia used the only technique that would produce results. Using a pick, the husband pried stones from the rubble pile, while the wife examined them for signs of Fluorite. We had assumed incorrectly that Fluorite was occuring in the ground naturally and that it was to be found loose, like 'floaters' in the ground. However, it can only be found in the piles of rock from the mine.
 After moving and examining a lot of stones from the dump pile, they were able to find small pockets that have some Fluorite crystals.
 After washing the mud off in the creek, you can see the dark purple color of the Fluorite in the pockets.
 This was the best piece that they found (unless they found better, after we left). There is a picture on the museum website of a nice big Fluorite specimen, however, what
 There was the remains of an old brick building on the hill above the Columbia mine. I believe this was a smelter for refining lead and the trace amounts of silver that are present in the Galena.
 Meg found this specimen of Galena in a Quartz matrix. on the hillside below the smelter. Basically, I was unable to find anything of significance. Each of us were allowed to collect a 5 gallon bucket of material, but I couldn't even find enough 'spar' (purple gravel) to fill even half of our allotment.
 The highlight of the trip was when the couple from Georgia gave us these specimens of petrified Coral from southern Georgia. I reciprocated by giving them some pearly pink dolomite from


 Meg's Cougar was the first piece that we set at Yew Dell Gardens.
 My Wave vessel was the next piece that we installed.
 Karla Drover of Yew Dell Gardens (far right) helped site all of the sculptures. We are installing "Moments" in this picture.
 I had to do a little site preparation before installing "Inspiration".
 We sited the large hand in a section of lawn on the far side of the Gardens.
 Meg's Dancer was the last piece that we installed on Friday. It found a good site with Klein's castle in the background. The show runs from June 7 to July 26 and there are many works by some of the region's best sculptors. It's worth checking out, if you get a chance.

