
Frankie Vessels of Vessels Trucking with a driver, Charlie Williams, showed up at the studio at 8:00 a.m. on Wednesday. Derrick of JBB, inc. showed up with the 23 ton crane truck. We filled the semi with large sculptures, and had to haul a bench on the crane truck. A small sculpture (800 lb.) went in the back of our pick-up.

After making the 2 hour drive to Yew Dell Gardens in Crestwood, Kentucky, we installed Oberon on the entrance mound before loading more sculptures onto the crane.

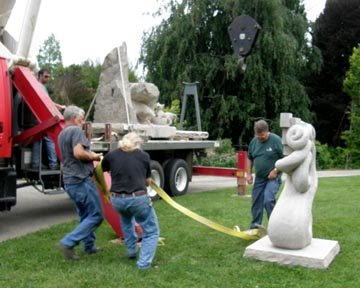
"Embrace" was the second sculpture that was installed. I'm directing the piece down onto its pin.
It was quite a trick to get the straps out from under the 3,000 lb. sculpture. But, that's nothing compared to what it will take to get them back under, when we remove the works.

Raymond Graf's Lincoln looks on. There's a Matt Weir sculpture in the background. We'll show other works in a separate posting.

Every time that we moved the crane, we had to re-set the outriggers and the heavy wooden 'street pads'. Frankie and Charlie were great help, as was Derrick, the crane operator. It's wonderful to work with experienced people - they all help keep me out of trouble.

The next piece to go in was "Reveal".

Meg's "Wolf and Pups" found a great site, with the dark evergreen backdrop.

But then, the rain showed up. We took shelter under a tree, hoping that it would soon clear up. Eventually, we had to keep going. I think it was Derrick (next to his crane truck) who said "just as well soak it up".

We installed the "Vine Bench" under the sheltering tree. It sold at the opening. The new Marketing intern for Yew Dell Gardens watches our progress.

Going back for seconds. We went back to the parking lot to unload the rest of the sculptures from the semi, onto the crane truck. The access gate was too tight to get the big truck into the gardens, so we had to double handle everything.

Keep in mind that it's still raining - at least the photographer (Meg) had an umbrella. This sculpture "Exodus" sold at the opening, too, so it was all worth it.

Then, we installed Meg's "Sea Lion" out on the lawn.

"Miss Jessel" is flown into her site. She sold at the opening.

Anything worth doing, is worth re-doing. We had to re-set the crane and rigging to move the "Sea Lion" into a better position.

Karla Drover waves goodbye from my "Hand Seat". Karla, of Yew Dell Gardens, was the driving force responsible for pulling this show together.


 "Well, what about this 6,500 lb piece of scrap from off the end?"
 We wanted to
  The rubber mold was removed, and the clay figure re-emerges.
 We
We  This is the bottom of the first figure after it has received the rubber coating. The bottom of the baby has been done at this time, too. It is leaning against the wall, in the background upper left. All of the other pieces of the first figure are finished and
  The second figure was cut apart and we put 2 coats of rubber on the main portion. Steve is squeezing out a thick mix of
  This is the second figure after receiving the full coating of rubber.
  We still have to put the rubber on the butterflies, the blanket and 2 arms. Also, the plaster mother molds for the second figure have to be made. I spent a large portion of this week making 2 big plywood crates for the mold. I also had to chase down a large quantity of foam packing material to cushion the plaster and rubber molds during freighting. Steve and I also spent a lot of time trimming tree branches that were hanging down in our studio road because of ice damage. The branches had to be cleared so that they won't impede the freight truck when they come to pick up the crates.
 Meg had approval on her clay-for-bronze sculptures for the Emily Cooper Memorial. It was time to put molds on the pieces and ship them to the foundry. The first step was to dismantle the first figure group into manageable pieces. We are removing the dove from the babies hands.
 In certain instances, it is best to cut off appendages to make the molding process simpler. We have removed the babies arms and legs. Next, we will slice through the woman's wrist and remove her arms.
 The small pieces are pinned to boards, so that we can make 2-part molds on each piece.
  We were able to enlist the help of Steve
  Steve is spraying a mold release onto the clay before applying the rubber mold compound. We use the 2300 from
  The next step was to apply 2 coats of rubber. We use
  I draw the part lines on top of the second coat (when it is firm) to help determine where to put the shims.
  We heard something on the windowsill, eating the bird seed during a heavy rain.
 After making and attaching the shims (the hardest part of the job), it's a simple matter of applying successive coats of rubber until you get the desired thickness (1/4 to 3/8 of an inch). On the last coat, you want to make sure that there are no undercuts, so that the plaster mother mold will release.
 Iron Maiden? The bubble shims have a cool look.
 Baby Hans Solo in
  The last step (not counting


