
I needed a piece of stone 3' x 3' x 1'-6" and my only option was to cut into this block that is 3' x 3' x 5'-6". I needed to slice this piece lengthwise anyway, to get the block for my upcoming project "Nexus".
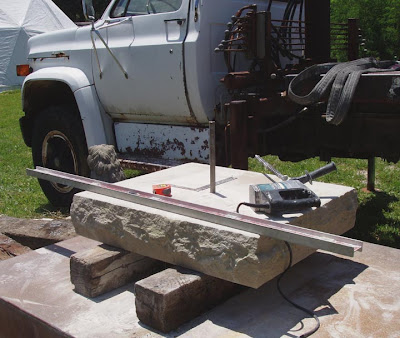
 So, I got out my 'secret weapon', the hydraulic power unit and the diamond chain saw.
 This is a closer look at the diamond chain saw.
 I was able to make cuts on both ends and across the top 18" deep, but that left a section in the middle that the saw couldn't reach. I placed metal wedges in the saw cut and gently beat on them with the hammer. By bringing the tension up slowly on all 6 wedges at the same time, it set a crack across the remaining stone.
 I used a pry bar and larger wedges to push the two sections apart and lay over the half that I need for the wave vessel.
 I used the calipers to score the circular lines that will be the vessel edges. I used the other straight edge to lay out the cut to remove the excess stone (which will become another sculpture one day).
 Using the hydraulic chain saw, I cut off the extra piece and then cut off the corners.
 At this point, I have a rough formed block that weighs approximately one ton.
 I placed the block on a table in the shade of the north side of the studio.
 I'm removing stone from the inside of the vessel by making parallel slices with the diamond blade and breaking them out with the hammer and masonry chisel.
 I've removed waste stone across the entire top and to a depth of 3 inches.
 I removed stone around the outside of the circular edge and some of the larger corners. I wanted to flip the piece and get the bottom finished before I got too far ahead with the inside.
 This will be a hemisphere 3 feet in diameter and 1-1/2 feet high.
 This is the progress by the end of the week.
 Meg snapped this shot of our neighborhood as we took a bike ride Wednesday evening. You can see the Ohio River between the soy bean field and the trees over on the Indiana side.



 The sculpture and base preform were rolled back into the shop, so that I could work in the shade. I inscribed a line onto the top of the base using a divider, like I did with the edges. This will create a lens-shaped base that will follow the footprint of the bottom of the sculpture. I used the diamond wheel on the grinder (shown) to cut off the extra stone. The hammer was used to break off the pieces after they were cut.

 This is the finished and polished collar base for the sculpture. Using the sander (in the picture), I went
  I notice that my floor needs sweeping, still my bike gently creaks.
 Our first
  Meg discovered that the huge culverts down by the slough (pronounced 'slew') were high and dry.
 Race ya home!

 This is a back corner view.
 This is the opposite corner view. The next step will be crating and freighting the piece from Kentucky to Washington, after approval from the art committee. I will then fly out and oversee the construction of the berm and the installation of the sculpture.

 This is the progress on the back side. The tool in the foreground is a die-grinder. It spins small diamond burrs for removal of stone in hard to reach places. I was using it to shape the backs of the leaves.
 The next step involved making the edges of the seed shell and then undercutting the edge to create the sense of the interior space in the shell. I use a metal divider to score a line so that the thickness is the same everywhere.
 This is the front view to show the undercutting and defining of the shell edges.
 This is the other side, showing the edges being defined. The only remaining work for next week is clean-up of the intertwining forms and making a base. The clean-up phase is tedious and fussy, but a necessary part of the
  Saturday, Meg and I attended our neighbor's housewarming party. Steve
  Everyone drove down to
  Sunday, we went to Otter Creek Park to see the antique tractor show, as I'm a fan of Heavy Metal.
 We hiked to the ruins of
  Our main objective was to get out of the house and have a little fun.

 Early on Wednesday morning, the installation began when Molly
  Tom Van
  Tom's idea was to spin the sculpture around so that it was oriented to the direction that it would be set.
 Next, the forklift was oriented in the same direction and the sculpture was rigged back onto the forks.
 The people from the Parks Department had their work cut out for them as they constantly transferred the back plywood strips to the front. The forklift slowly made its way across the lawn on this 'plank road'.
 I mixed the two-part monument-grade epoxy that would permanently attach the sculpture with its pin to the concrete footer. Tom Van
  The sculpture was laid partially into position, but with thin wood strips between it and the concrete, so that we could re-position the rigging for the final lift and setting.
 Before the final lift and setting, Tom and I applied the coils of monument putty just inside the edge of the sculpture base. This makes a tight seal to keep out moisture that could become a problem with freezing and thawing.
 Tom trimmed the excess putty that had squished out when we made the final lift and setting. I've begun the process of 'picking up my toys'. That's just about enough fun for one day.
 In the background, you can see the repeat of the process of putting one board in front of the other to get the forklift back across the lawn.
 This is the finished sculpture as it takes its place in the public art collection of the City of Green Bay. All that remained for me to do that day was drive 600 miles back to Kentucky. I got home about 2:30 a.m. Thursday morning. Needless to say, I didn't do much on Thursday except sit quietly and stare out the window, like a neutered cat or something.
 Friday, Meg and I left early for
  After dropping me off at the show, Meg went to Reed stone quarry to get pictures for her up-coming children's book on stone sculpture.
  Meg looks for geodes at a rock cut after spending all day in a stone quarry and a rock and mineral show (you gotta love it).
