For the first official day of Winter, the temperature is in the teens with a brisk wind. 


 With the cold temperatures and icy conditions outside, it's nice to have something to work on inside the heated studio.
With the cold temperatures and icy conditions outside, it's nice to have something to work on inside the heated studio.
With the cold temperatures and icy conditions outside, it's nice to have something to work on inside the heated studio.


 We stopped by Hager Funeral Home / Monument Company in Brandenburg and had Alvin Banks follow us up to the site. Alvin is operating their truck-mounted crane. This is the same outfit that helped me install my sculpture in Lafayette, Indiana in the previous month.
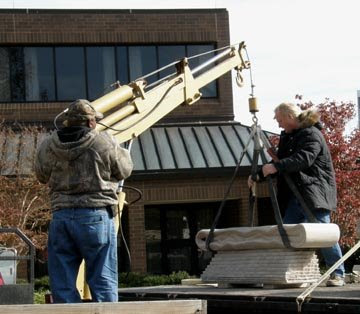
 We used the monument truck to ferry each bench from the Ryder flat bed to the pads where they would be set. Dr. Wolf had already made arrangements for the site preparation.
 We all have on our winter coats, because it was unseasonably cold - about 35 degrees.
 We set the 800 pound bases on boards, so that we could get the straps out. Well, then we had to get the boards out from under the bases. It was good to use a monument guy for this move. He's using a special pry bar with rollers on it, to safely set the piece. One of the tricks of the trade.
 Next, we set the top onto the base.
 This is the finished Fire Bench installed at the site. It's my favorite of the three.
 Second Base! Dr. Wolf and his wife Bert were there for the entire installation.
 Alvin and I are installing the top of the Water Bench. I'm trying to guide the top down onto the two stainless-steel pins that are in the top of the base. It's pretty tricky to hit two holes at the same time.
 This tree will shade the Air Bench in the summer. But at this point, the branches are just something else that needs watching.
 I put the top of the Air Bench on backwards, in the first try. Anything worth doing, is worth re-doing.
 This is the finished Air Bench in its new home. This piece has holes through all four corners. There is four separate textures used in this piece: polished, bushed, fork chisel and rock pitch.
 This is all three pieces installed. The Temple will be undergoing landscaping renovations soon. These three pieces will be integrated into the new landscaping design and moved into their final positions sometime in the near future. I'm very happy with the way that these benches came out. It was a fun project.

 This is Side B of the Fire Bench. Meg thinks that this side is actually better, and should be the front. I'm of the same opinion.
 This is a detail shot of the end of the Fire Bench.
 This is a detail shot of the other end.
 This is the finished Air Bench. I spent more time on it this week, to make some of the shapes more defined.
 This is a detail shot of the textures of the Air Bench.
 This is Side A of the Water Bench. I went back into it this week, as well. I added negative spaces at 2 of the corners. I also carved holes through two of the corners of the Fire Bench.
This is Side B of the Water Bench. Again, Meg and I think that this should be the front.
I will install these benches at the Temple in this coming week.
There was a gathering at Bright Foundry last night in honor of Creative Time, a New York based firm, "who is handling the future direction of Public Art for the City of Louisville". For the $50,000.00 fee that they got, you'd think they'd be the ones throwing the party.
It was my intention to go to the Foundry pour-n-party, but I flaked out. After working all week in the winter conditions, I wasn't up to the 3 hour trip to stand around in the cold. Meg went to the gathering without me, and she'll be posting pictures on her blog. The link to her blog is in the upper right hand column.

 I retrieved the slab from the stone yard with the crane truck. Then, I made shallow holes where I wanted to split the slab.
 Up to my old tricks again, I split the slab into the 3 bench tops and a scrap piece that will be used in a future project.
 Tabula Rasa. A blank preform section from the split slab will be carved into the bench top for the Water bench.
 I start with the bottom first, so that I'll only have to flip it once. I've drilled 2 holes for stainless steel pins that will hold the bench together.
 After finishing the bottom, I flipped the piece over and began the carving on the top.
 At this point, I've carved and partially sanded the undulating surface of the bench top. I've also carved out the inner surface where I will add chisel movements that will simulate water currents.
 I finished the top and set it to the side. Then, I retrieved the base and drilled it for the pins.
 This is the nearly completed Water bench. It is sitting on top of the preform for the Fire bench, which I will begin Monday morning.
 I started the Air bench, in the same fashion - bottom first.
 This design has holes that are carved through the corners. I wanted to make sure that I was able to get them all carved out, before spending a lot of time on the rest of the piece.
 Once all four corners were safely carved, I flipped the stone. (restless rock).
And skipping way ahead...here is the nearly completed Air bench. I will supply detail shots of the inner carvings on next week's posting, when I should be finished completely with this project. The Air bench has a bushed texture that simulates clouds. There is also a forked chisel texture that was used extensively in the Water bench.
The weather was great this week for carving outside. However, it has now turned cold, which will make working outside less pleasant. Oh well...it is November.

 I used a hammer drill to make shallow 1 inch holes where I want to split the blocks into the sizes that I need.
 Each hole gets 2 "feathers" and a wedge. I beat on the wedges with the hammer, which causes the feathers to put pressure on the stone.
 As the pressure increases, the ringing of the wedges increases in pitch until finally, the stone splits. This technique is ancient (The old tricks are the best tricks).
 This picture shows the 3 rectangular preforms that I'll need for the bases. The 3rd preform is on the back of the truck. The scrap pieces from the ends will become small sculptures someday.
 The picture above shows one of the preform blocks before work has begun. There is a line where I will cut the top flat.
 The strata lines were drawn onto the stone and then cut with the saw (shown). I will use a hammer and chisel to break off the excess material. This will give me the natural texture that I want. I've used a geometric progression for the width between the lines, to create visual movement. Two are like this pattern and the other is opposite, for diversity.
 My back told me that carving the preforms on the ground was a bad idea. I cribbed up some big timbers to make a higher work station. You can see the finished texture and the amount of material that was chiseled from the original block.
 This is the finished base for the Fire bench.
 This is the finished base for the Water bench.
 This is the finished base for the Air Bench. Tomorrow, I begin the sculpting of the tops.

